The Practices of Backbone.Marionette That I believe The Best
On Marionette.Module
Dividing app into sub-modules
You can create sub-modules as many as you want inside one Marionette app. I higly enoucurage to take the advantage of sub-modules.
You can also say that sub-module is sub-application. The easiest way to imagine is Gmail. Gmail has many features: email, chat, contacts list, etc. You can construct each component as sub-modules in Marionette.
Let’s look at how we define sub-modules.
var MyApp = new Backbone.Marionette.Application();
MyApp.module("ModuleA", function(ModuleA, MyApp, Backbone, Marionette, $, _){
  // your module code goes here //
})
You may wonder about parameters in callback function. This is automatically passed in this order:
- The module itself
- The Application object
- Backbone
- Backbone.Marionette
- jQuery
- Underscore
They are defined in local scope and only accessbile from the callback function.
One of the benefits of using sub-modules is you can write codes of a module into separate files with ease.
Let’s say you define a ShoppingCart module.
var MyApp = new Backbone.Marionette.Application();
MyApp.module("ShoppingCart", function(ModuleA, MyApp, Backbone, Marionette, $, _){
    // your module code goes here //
})
You can easily guess what the module does: it takes care everything about shopping cart feature in your app.
One single ShoppingCart module is still too big to be written in a file. So, let’s divide them into separate files based on functionality: Controller and View.
shopping_cart_controller.js
MyApp.module("ShoppingCart", function(ShoppingCart, MyApp, Backbone, Marionette, $, _){
    ShoppingCart.Controller = Marionette.Controller.extend({
        // controller implementation goes here
    });
})
shopping_cart_view.js
MyApp.module("ShoppingCart", function(ShoppingCart, MyApp, Backbone, Marionette, $, _){
    ShoppingCart.View = Marionette.ItemView.extend({
        // view implementation goes here
    });
})
When you create modules, you don’t have to worry whether your module is already defined or not. If not defined, Marionette defines for you. So, in the previous case, ShoppingCart module is defined in shopping_cart_controller.js and shopping_cart_view.js just adds things to the module.
Maybe ShoppingCart.View still contains too many views to be in a single file such as show_view or new_view. You can further divide your ShoppingCart sub-module like this.
show/shopping_cart_view.js
MyApp.module("ShoppingCart.View", function(View, MyApp, Backbone, Marionette, $, _){
    View.ShowView = Marionette.ItemView.extend({
        // show view implementation goes here
    });
})
new/shopping_cart_view.js
MyApp.module("ShoppingCart.View", function(View, MyApp, Backbone, Marionette, $, _){
    View.NewView = Marionette.ItemView.extend({
        // new view implementation goes here
    });
})
I create separate directories for show and new and put each file there. You can continue this process until you are satisfied.
Probalby enough words are spoken to introduce sub-modules.
So here is the pattern statement. Use sub-modules to seperate codes
Starting and stopping sub-modules
You can start and stop your sub-modules individually. By default, sub-modules is automatically started when Marionette parent app is started. You can change this behavior by startWithParent option.
MyApp.module("ModuleA", function(ModuleA, MyApp, Backbone, Marionette, $, _){
    this.startWithParent = false;
})

MyApp.start() // this doesn't start ModuleA
MyApp.ModuleA.start() // you have to start by yourself
Why is this important? Because sometimes you want to execute some codes before starting other modules. Let’s say you need to load some resources from a remote server when user enters your app and other modules are dependent on that resources.
MyApp.on("start", function() {
    // Let's say deferredFetchihg grubs some data from remote server
    $.when(deferredFetching()).done(function(data) {
        // Set data to Module1
        MyApp.Module1.setData(data);

        // Now Module1 is ready to start
        MyApp.Module1.start()
    });
})
How about stop()? I don’t think you need to use stop() unless your app is huge so that you need to pay careful attention to memory usage.
However, stop() is very useful when it comes to testing. I will cover this in the following post.
Organize your files by module base
There is no canonical way to organize your files in Backbone.Marionette. However, it is good to agree on a convetion for how to name and organize files in project if you are working in a team. This is the pattern that works for me.
project_root/
    |
    |---application.js
    |
    |---small_module/
    |      |
    |      |---small_module.js
    |      |
    |      |---small_module_controller.js
    |      |
    |      |---small_module_model.js
    |      |
    |      |---small_module_view.js
    |      |
    |      |---templates/
    |              |
    |              |---template1.hbs
    |
    |---big_module/
           |
           |---big_module.js
           |
           |---big_module_controller.js
           |
           |---big_module_model.js
           |
           |---new
           |    |
           |    |---big_module_new_view.js
           |    |
           |    |---templates/
           |            |
           |            |---template1.hbs
           |            |---template2.hbs
           |---edit
           |    |
           |    |---big_module_edit_view.js
           |    |
           |    |---templates/
           |            |
           |            |---template1.hbs
           |            |---template2.hbs
application.js is where you want to decalre global things of your app. This includes
- App initialization code
- App starting code (Ex:
App.start()) - Route definition and initilalization
- Useful global helper (Ex:
App.currentUser(),App.showSuccessNotification())
I like module-based file hierarchy.
In module based organization, files other than application.js goes under each module directory. If the module is big one, they are further broken down into seperate directories by action.
The role of each file under module direclty is self-explanatory except <module_name>.js.
<module_name>.js is used to define basic things for the entier module. These includes:
- module option (Ex.
this.startWithParent = false) - module initilaization (Ex.
addInitializer({})) - event listener (Ex.
Module1.on("event", function({})))
Maybe it is fair to explain <module_name>_controller.js since it does not exist in Backbone as well.
<module_name>_controller.js holds methods that redpond to user entry to your app. One example of such method is something like showItem(). What showItem() does is that instantiate a view, fetch model, pass it to view, and call render() of view to display html. It is similar to what Rails ActionController does.
At last, you may think it is redudant to prefix every files with module name, but this makes it easy to search files by module name. Not must to have, but it is useful once your project becomes bigger where you have many controller.js or view.js.
About View
Organizing DOM with ui
This pattern is inspired by the blog post.
ui is simple yet very powerful feature of Marionette. You can organize view’s DOM by using ui. Here is simple example. Say your have a template.
<div id="edit_form">
  <input class="name_input">Name
  <input class="email_input">Name
  <button type="submit" class="js-submit">Submit</button>
</div>
And your view code looks like this.
MyView = Marionette.ItemView.extend({
    template: "#edit_form",

    ui: {
        nameInput: "input.name_input",
        emailInput: "input.email_input",
        submitButton: "button.js-submit"
    }
});
If you don’t have ui, you can access name input by using jQuery like this.
var myView = new MyView()
var input = myView.$el.find("input.name_input");
By using ui, you can access this way.
var myView = new MyView()
var input = myView.ui.nameInput;
The difference is subtle, but later one is more maintainable. Here is why.
Html markups are the subject of frequent changes. This is not an issue if the DOM is referenced from a single place. However, when multiple places look at a single DOM, it becomes difficult to maintain.
Suppose one person changes the class name of a input field from name_input to name_field. Also suppose that many codes refer the DOM by using jQuery: myView.$el.find("input.name_input"). Now, you have to change every codes that uses jQuery to access the DOM. If the DOM is referenced from tests codes, these tests all suddenly break and updating every places is the nightmare.
ui solves the issue. If your codes refer the DOM by using myView.ui.nameInput, then the person who changes the html only needs to change ui object.
ui: {
    nameInput: "input.name_field",
    // edited for brevity //
}
And the rest of codes stay the same. Huge improvement.
So here is the pattern statement. Avoid jQuery and always use ui to access view’s DOM
Using LayoutView to create nested sub-views
This pattern is inspired by the blog post.
I saw different people use different ways to create nested views in vanilla Backbone app. Marionette however provides us a nice pattern to archive this.
We will use Marionette LayoutView and Region.
Let’s take a example of creating shopping car page. The page contains two sub-views: item list view and pricing view.
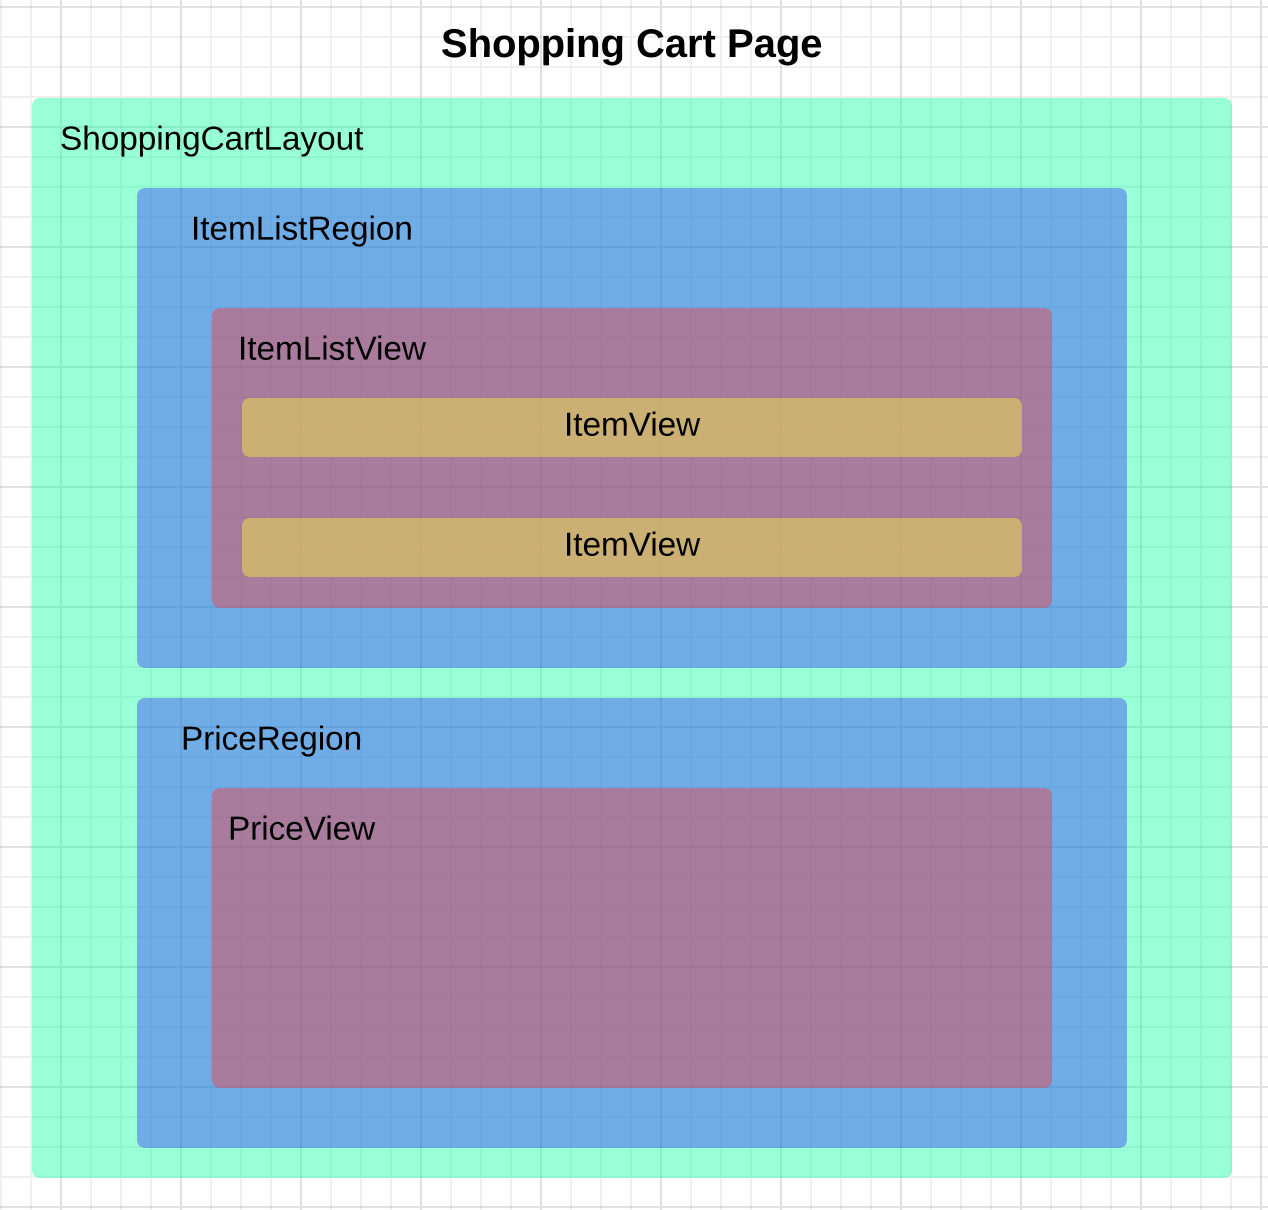
Here is our code that creates this shopping cart page. First we create a layout html and layout view.
shopping_cart_layout.html
<div id="shopping_cart_layout">
  <div id="itemlist_region"></div>
  <div id="price_region"></div>
</div>
shopping_cart_layout_view.js
ShoppingCartLayoutView = Marionette.LayoutView.extend({
    template: "#shopping_cart_layout",

    regions: {
        itemListRegion: "#itemlist_region",
        priceListRegion: "#price_region",
    }
});
Let’s talk briefly about what LayoutView is. According to official doc,
A LayoutView is a hybrid of an ItemView and a collection of Region objects.
So, it is simply extended from ItemView and add Region objects. Since it is extended from ItemView, you can attach template where you can speficy region container DOM. Layout can hold as many region objects as you want so they are suitable to create a parent view.
Now, let’s quickly create our sub-views. The template for these views are not important at this subject so let’s imagine we have templates for them.
item_list_view.js
ItemView = Marionette.ItemView.extend({
    template: ItemTpl,
});

ItemListView = Marionette.CollectionView.extend({
    childView: ItemView
});
price_view.js
PriceListView = Marionette.ItemView.extend({
    template: PriceTpl,
});
Now we are ready to put all things together. Here is the code that renders the shopping cart page. Again, model and collection are not important at this subject, so let’s assume we have items collections already.
// Instantiate views
layoutView = new ShoppingCartLayoutView()
itemListView = new ItemListView({collections: items}) // We assume that items is the collection
priceListView = new PriceListView()

// Put them into layout regions
layoutView.itemListRegion.show(itemListView);
layoutView.priceListRegion.show(priceview);
That’s it. Marionette region provides a convenient method called show() where you can pass any views to be rendered. el property of passed views are automatically provided by region. This is the reason why you don’t see el object often when using Marionette.
Creating further nested sub-view is easy. Let’s say you want to divide PriceListView into TotalPriceListView and SubTotalPriceListView.
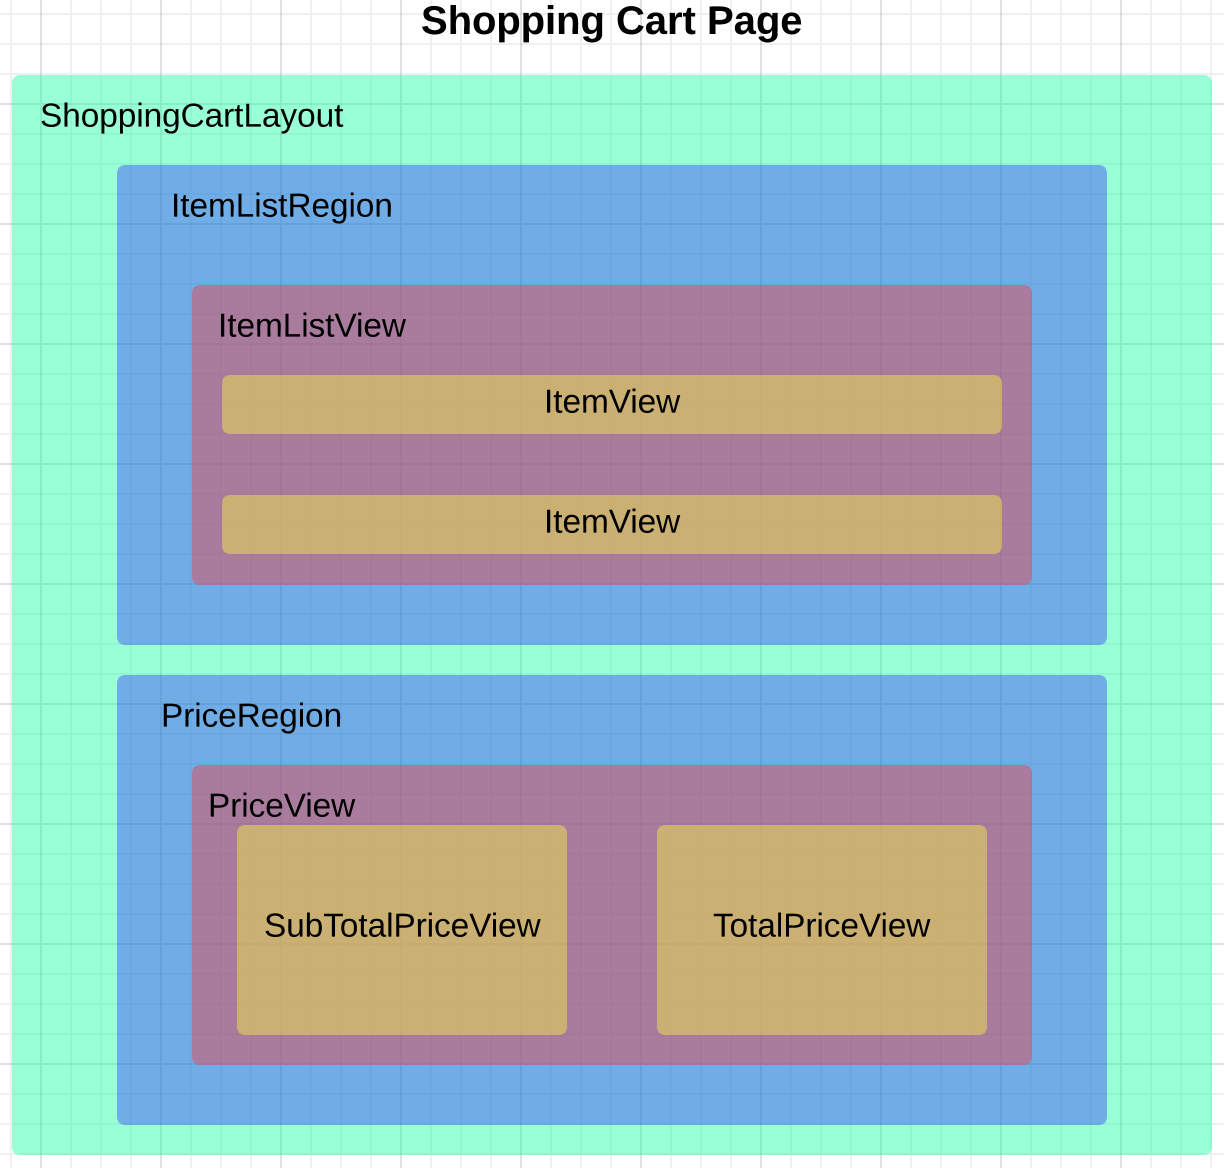
What you have to do is extending PriceListView from LayoutView instead of ItemView and add region objects.
price_view.js
PriceListView = Marionette.Layout.extend({
    // Let's assume the template has #total_price_region and #sub_total_price_region
    template: PriceTpl,

    regions: {
        totalRegion: "#total_price_region",
        subTotalRegion: "#sub_total_price_region",
    }
});

totalPriceListView = Marionette.ItemView.extend({
    template: totalPriceTpl,
});

subTotalPriceListView = Marionette.ItemView.extend({
    template: subTotalPriceTpl,
});
And put them together.
priceListView = new PriceListView()
totalPriceListView = new TotalPriceListView()
subTotalPriceListView = new SubTotalPriceListView()

priceListView.totalRegion.show(totalPriceListView)
priceListView.subTotalRegion.show(subTotalPriceListView)
It’s a piece of cake.
Before closing this section, let me introduce how to access views rendered inside region because you will often use it.
Let’s say you want to access <div id="total_price">$10000</div> DOM to get the total price of the shopping cart from your code. In this case, you will use currentView() API. The code looks like this:
layoutView.priceListRegion.currentView.totalRegion.currentView.ui.totalPrice
As you can see, it’s easy to access the value of nested sub-views.
So here is the pattern statement. Use LayoutView to create sub-views over simple ItemView.
About Controller
If you come from vanilla Backbone, you are not sure what the role of Controller in Marionette. Unforunately, official doc doesn’t help you either.
Quoted from here
Its name can be a cause for confusion, as it actually has nothing to do with the popular MVC architectural pattern. Instead, it’s better to think of the Controller as a base object from which you can build.
Controllers should be used when you have a task that you would like an object to be responsible for, but none of the other Marionette Classes quite make sense to do it. It’s a base object for you to use to create a new Class altogether.
This makes you further puzzled. How should I use Controller?
Here is how I use Controller.
Use Controller as integrator
This pattern is inspired by the book.
The role of Controller is to instantiate objects, access backend, and build complex vies: performs everything required to render a complete page in a browser.
Let’s imagine that we want to render previous shopping cart page.
To render the page, several things has to be done.
- Instantiate views (layout views, item list views, etc)
- Retrieve items and prices (ajax call to backend server)
- Render views (call show() method of views)
- Error handling (when ajax call fail )
I will perform these things in a single method showShoppingCart() and this method goes to our imaginary ShoppingCart module.
MyApp.module("ShoppingCart", function(ShoppingCart, MyApp, Backbone, Marionette, $, _){
    ShoppingCart.Controller = {
        showShoppingCart: function() {
            // implementation of this methods
        }
    }
})
Inside the method, you write codes that perform things that I mentioned above.
MyApp.module("ShoppingCart", function(ShoppingCart, MyApp, Backbone, Marionette, $, _){
    ShoppingCart.Controller = Marionette.Controller.extend({
        showShoppingCart: function() {
            // Let's suppose that items and its prices are saved in backend.
            // So, we need to retrive them from backend server asynchronously.
            // Imaginary MyApp.request("items") and MyApp.request("price")
            // returns promise object that fetches items and prices respectively.
            var fetchingItems = MyApp.request("items");
            var fetchingPrice = MyApp.request("prices");

            // Instantiate a layout view that provides regions
            var layoutView = new ShoppingCartLayoutView();

            $.when(fetchingItems, fetchingPrice).done(function(items, prices){
                // Add callback method when ajax call is successfully done.
                // First, we will build collections
                var itemList = new ItemList([items]);
                var priceList = new PriceList([prices]);

                // Now we can instantiate views and pass colletion to them
                var itemListView = new ItemListView({collection: itemList});
                var priceListView = new PriceListView({collection: priceList});

                // At this point we are ready to render a complete paga for user
                layoutView.itemListRegion.show(itemListView);
                layoutView.priceListRegion.show(priceListView);
            });

            // We don't want user to see nasty error, so let's add error handling
            $.when(fetchingItems, fetchingPrice).fail(function() {
                // OopsView will show error message to user
                var oopsView = new OopsView({error: "oops, something went wrong"});
                layoutView.render(oopsView);
            });
        }
    });
})
The example above is pseudo code so it doesn’t work, but should be easy enough to demonstrate my idea.
As you can see, my showShoppingCart() method does everthing including error handling required to show a shopping cart page to user. Now, somebody must call the method. Who will it be?
It is the responsibility of Marionette.AppRouter. Router is the first one that responds when user enters your app. It’s job is to look at url and call Controller’s methods. Here is how you can pass your ShoppingCart.Controller to router.
// First we need to define router
MyApp.Router = Marionette.AppRouter.extend({
    appRoutes: {
        "shopping_cart": "showShoppingCart",
    }
});

// Instantiate controller object
var shoppingCartController = new ShoppingCat.Controller();

// Register controller
new MyApp.Router({
    controller: shoppingCartController
});
Now, if user accesses /shopping_cart page, router will call showShoppingCart() method of ShoppingCat.Controller.
There is one implicit thing involved here. The object you pass to controller property of router must implement the method that you define in appRoutes objects.
In this case, since you define "shopping_cart": "showShoppingCart" in routing, shoppingCartController object must implement showShoppingCart() method, which is exactly how we implemented our controller earlier.
If you have experiences with server side MVC frameworks, like RoR, then you may notice that I am using the Marionette Controller like the way I use ActionController of Rails: called by router and does everything needed to render a view. Isn’t this contradictory to what [official doc](here says?
Yes and no. Yes, because it is used by router and both performs similar tasks. No, because the role of server side Controller is providing HTTP terminal point whereas client side Controller does not do this.
Anyway, I am currently satisfied with the way I use Controller.
So here is the pattern statement. Use Controller to provide public methods to router that integrates different componetns
Add event listener on view inside Controller
I often ask this question myself: Is it ok that my View does ajax call? Can you imagine what I am talking about? The View that makes ajax call looks like this.
FormView = Marionette.ItemView.extend({
    events: {
        'click button.submit': 'submitForm'
    },

    submitForm: function() {
        // Get form data somehow//
        var data = getFormData();

        // Model.save fires ajax call to remote server
        this.model.save(data, {
            success: function(){
                console.log("form is submitted");
            },
            error: function(){
                console.log("error");
            }
        });
    }
})
So, the code above does:
- Listens on
clickevent and callsubmitFormmethod - Makes ajax call to save form data to backend server
- Execute callbacks for ajax call
This is perfectly valid code in Backbone. However, having Controller in Marionette now, I’d rather want to push this task to Controller and let View simply listening and triggering event.
FormView = Marionette.ItemView.extend({
    events: {
        'click button.submit': 'submitForm'
    },

    submitForm: function() {
        this.trigger("form:submit");
    }
});

FormController = Marionette.Controller.extend({

    showForm: function(options){
        var formView = FormView.new();

        formView.on("form:submit", function(data) {
            model.save(data, {
                success: function() {
                    console.log("form is submitted");
                },

                error: function(){
                    console.log("error");
                }
            })
        })

        MyApp.region.show(formView);
    },
});
So, I simply move codes from View to Controller. What’s the benefits of doing this? One thing is that View code gets slimed and it can focus on the mapping of DOM and event.
Our Controller instead gets messy but that’s the tradeoff. After all, that’s how Controller is designed to be used: put things that fit nowhere else.
It also makes sense to put codes to Controller because Controller has more accesses to other components than a view. Imagine a case where you have to access other views inside the event listener. You can’t access other views directly from a view. Instead, you need to use App level event publishing to archive this.
On the other hand, Controller has an access to everything needed to render the page so it can easily talk to other views.
Before, finishing this section, let me slightly imporve the code above. We will use View.triggers.
Here is the new version of View:
FormView = Marionette.ItemView.extend({
    triggers: {
        'click button.submit': 'form:submit'
    }
});
We removed submitForm method and event objects. Instead, we use trigger object that does the two thing at the same time: listen on events and trigger events. Now, our view is much cleaner than before!!
So here is the pattern statement. Add event listener on Views inside Controller